OS X Built-in Security (1) – Security & Privacy
I have referred to OS X’s built-in security tools before and while OS X is a robust and secure system out of the box, it can get 300% better with a few simple tweaks of these settings. So here it is, OS X’s built-in Security & Privacy step by step. [Updated on December 22nd, 2013 to include Mavericks changes]
General
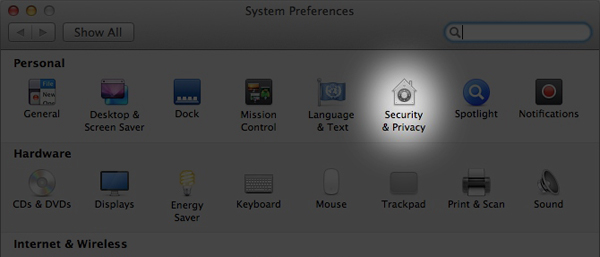
First, open up your System Preferences through the Apple menu or the icon in your Dock and select Security & privacy.
We’ll walk through each window and all it’s options, starting with the General tab.
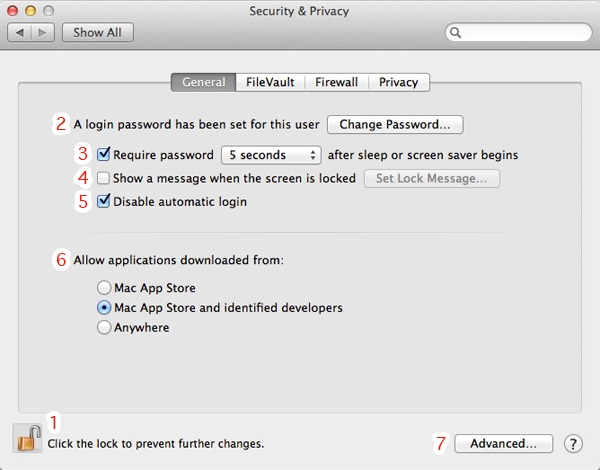
1. Start by unlocking the preference pane so changes can be made.
2. An option is provided to change your login password, you can use this or go to the Users & Groups preference pane.
3. This option is very useful in protecting your Mac while you are away from the keyboard. I recommend setting this up wether it’s an office computer or one at home, it will prevent anyone from snooping around when you are not there. Why would you set this if it’s a home computer? For example, imagine you are sleeping or away and your house is broken in to, even though you left your Mac on it’s contents are safe. A thief would have to power down the Mac to take it which would result in him seeing a login password next time it’s powered up. The timer can be set to Immediately, 5 seconds, 1, 5 or 15 minutes, 1 hour or 4 hours. I have mine set to 5 seconds, this way i can quickly tap a key or click the mouse if the screen saver comes on and i happen to be at my desk just doing something else. Setting it to Immediately can get annoying and using anything more than 1 minute increases the risk of someone getting access to your data when you are not around. I also set the screensaver to automatically start after 10 minutes in case i walk away from the Mac and forget to start it manually. Starting the screensaver manually every time you walk away can be done very easily by putting your mouse in a Hot Corner. To read more about Hot Corners to to System Preferences > Desktop & Screen Saver > Hot Corners. I park my mouse pointer in the top left corner of my screen automatically now every time i step away from my desk, it became a habit. In case i do forget the screen saver will start automatically after 10 minutes. Find a schedule and method that works for you.
4. An optional message can be shown below your password window. Set something like “Don’t, i know where you live” as a scare tactic or “Look behind you!!” as a prank. If you’re going to set a message at least be creative 😉
5. I highly recommend you check this box and keep it checked. It will prevent your Mac from booting straight to your desktop and it will ask you for a name or password or both (depending on how you set it up) instead. Mavericks no longer has this checkbox, instead this option can be found in System Preferences > Users & Groups > Login Options. A drop down menu allows you to disable automatic login.
6. This should be set to “Mac App Store and identified developers” always. It will keep you safe from almost all malicious applications and scripts and if you do have a trusted application that is not from the App Store or an identified developer, simply right-click that application and select ‘open’. This will still allow you to open any application and OS X trusts you know what you’re doing and remembers it for next time. So you won’t have to right-click-open that application again, you can just double-click it or click it from your Dock.
7. The advanced button will open a small window that gives you a few more settings to help secure your Mac. This button is available in all tabs but leads to the same settings.
7.1 The first option lets you set a timer. The Mac will log you out after a specified time of inactivity.
7.2 The second option will make sure that an administrator name and password is always required to access locked preferences. If you are the administrator and the only user of the computer you can leave this off but if it’s a shared computer or a non-admin workstation you can check this box to make sure preferences are not changed.
7.3 The third option should always be checked. It allows OS X to automatically update the safe downloads list. This updates it’s built-in File Quarantine / XProtect system that protects you from vulnerable Flash or Java versions and a few versions of malware. Mavericks no longer has this third option, updating is enabled by default and can not be disabled through OS X’s UI.
FileVault
Now that the General preferences are set, click the FileVault tab.
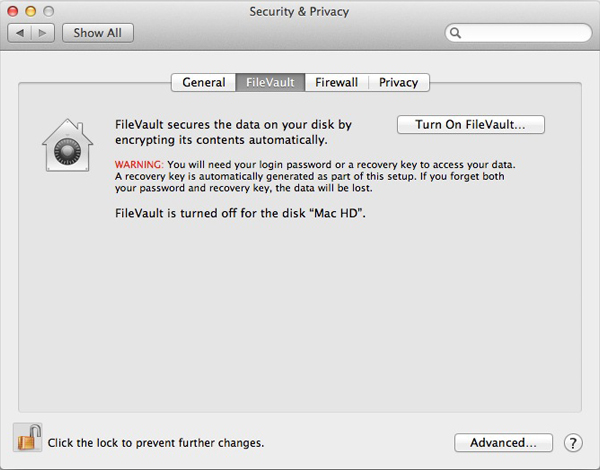
As the information mentions, FileVault will encrypt the contents of your startup disk. I recommend you enable this on any Mac able to run 10.7 Lion and 10.8 Mountain Lion. Older systems and OS X versions prior to Lion may experience slower performance so try it and see if the performance hit is acceptable. Lion and Mountain Lion however do not experience this performance hit so FileVault should be used. Make sure you read the warning though, if you lose your password and your recovery key (generated when FileVault is enabled) you are screwed. With your startup drive encrypted you can be sure that anyone that is not authorized will not gain access to your data, wether they try to log in or physically take the hard drive and try to access it from another system. Having a system with custom Flash drive like the MacBook Air or Retina MacBook Pro makes this even harder for potential thieves.
Once you click “Turn On FileVault you are presented with a users window. Your user name has a green check badge behind it indicating you are authorized to unlock the disk. If there are other user accounts on the Mac you can authorize them at this point to unlock the startup drive. Click the Continue button once you are done authorizing additional users and you’ll be presented with a recovery key. Write this key down on an actual piece of paper and store it somewhere safe, don’t take a screenshot or save it in a text file and save that as you will not be able to access that if you are ever locked out. If you do prefer a screenshot or text file then print it before clicking the Continue button. NOTE: Clicking the cancel button at this point will erase the recovery key, next time you click Turn On FileVault a completely different key will be generated. So once you write down the key click Continue and if you Cancel then throw out the key you wrote down as it may cause confusion later.
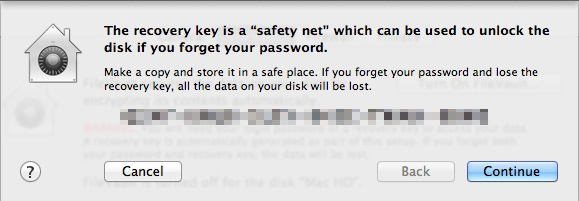
Clicking the Continue button will result in another message offering you to store your recovery key with Apple. If you decide to do this you will need your Apple ID to make it happen. If you ever lose your key you can contact Apple, answer three security questions and retrieve your key. If you decide not to store it with the NSA, err i mean Apple, then make extra sure you save it in a safe place.

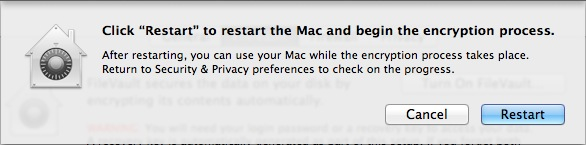
Once you have made your choice, click Continue and restart your Mac.
Firewall
With FileVault and your piece of mind all set, let’s move on to the next tab, Firewall.
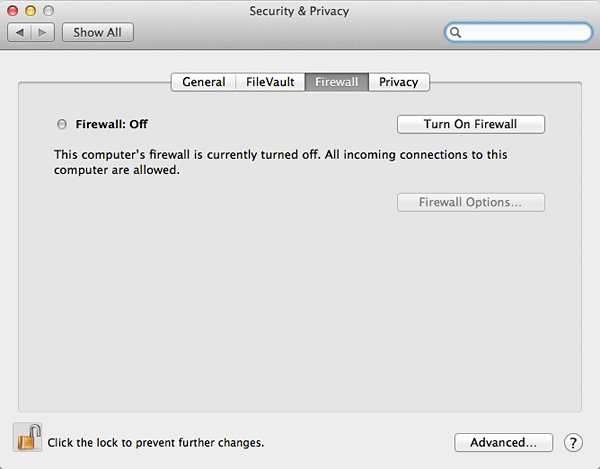
The firewall has been around almost as long as the internet itself and prevents unwanted connections to your system. However, it is not a set-and-forget service. Once enabled click the Firewall Options button and explore the options. I can not tell you how to set up the firewall as each situation is different. Use the ‘Block all incoming connections’ option if you are in an untrusted environment but still need essential internet services. The second and third options are good to have enabled by default and you can use the list to manually add applications and set their permissions. It might work without issues right away or you might find an application or service no longer works properly. If the latter is the case go back into the options and make some tweaks. Most people keep the firewall off or turn it off after trying it because it is too much of a hassle but it pays to set it up right. If an application or service wants access but has not been configured yet, OS X will present you with a small message asking what you would like to do.
Privacy
Up next, the Privacy tab.
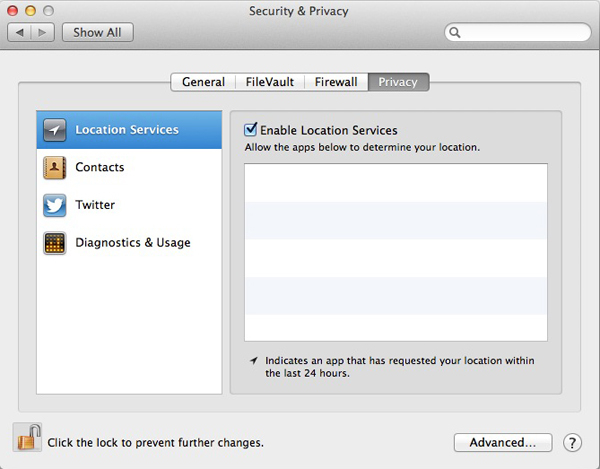
There is not much to set up here but it is good to check this panel once in a while to make sure no settings have been changed or applications are accessing data you don’t want it to access. Much like the firewall the way this panel looks varies with each person. I am not a fan of location services but do have it enabled on my laptops because i use Find My Mac. The contacts panel will show you all the applications that have access to your contacts list. Uncheck the ones you don’t recognize and/or don’t want or need. Diagnostics & Usage is a personal preference. I keep it off because i do not want my information and data sent to Apple and whomever has access to their servers but you can enable it if you want. Either way it will not affect the performance or functionality of your Mac. Inspect these panels from time to time and click the lock when you are done to prevent unauthorized access.
That’s it for Security & Privacy. See follow-up posts that cover other built-in security features here. Do a search for “OS X Built-in Security” or click here.
I like what you guys are usually up too. Such clever work and coverage!
Keep up the great works guys I’ve added you guys to blogroll.