OS X Built-in Security (4) – Disk Utility
This is the fourth post in the series. You should be well on your way to a properly secured Mac after configuring Security & Privacy, Users & Groups and Sharing settings. Now it’s time to explore Disk Utility. As the name implies this tool allows you to perform all kinds of disk related tasks and the average Mac user will hardly or never use it as it’s features and abilities are mostly unknown. While Disk Utility should definitely be treated with respect as misuse can result in data loss, it has some really neat features that can help you secure your data and privacy. Disk Utility has more features than i will describe in this post, i’ll just cover the security related ones.
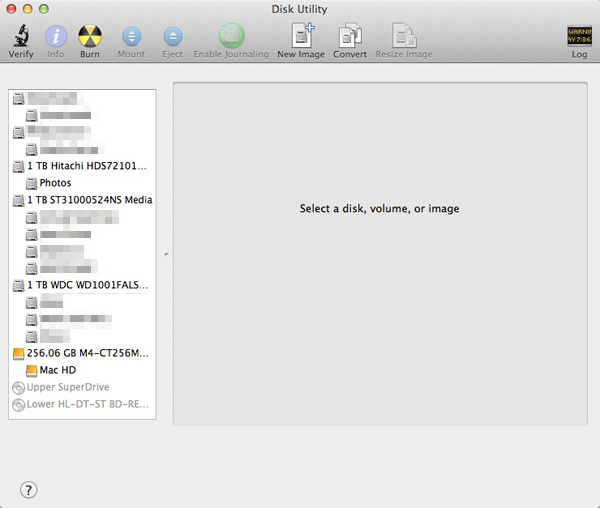
You can find Disk Utility in the Applications > Utilities folder on your startup drive. Once opened you’ll be presented with the main window. All your disks and partitions will show in the left column. The contents of this column can vary a lot. If you have a MacBook Air, you’ll only see two disks (the drive itself and the actual partition on it that holds your system). If you have a MacBook Pro or iMac you’ll see the two disks and also the SuperDrive. A Mac Pro may have a lot more. It also lists partitions you may have made and external drives.
![]()
Simplified, the disk is the physical hard drive (or solid state / flash drive). The partition holds your data. By default in a Mac the disk name is the size, brand and model number and the partition is named ‘Macintosh HD’.
Before we even touch any drives or partitions, have a look at the icons at the top of the window, specifically the “New Image” icon. I have covered this feature before in the “Computer theft, how to prepare” post but i will copy the contents here so you don’t have to bounce back and forth between articles.
Encrypted Disk Image
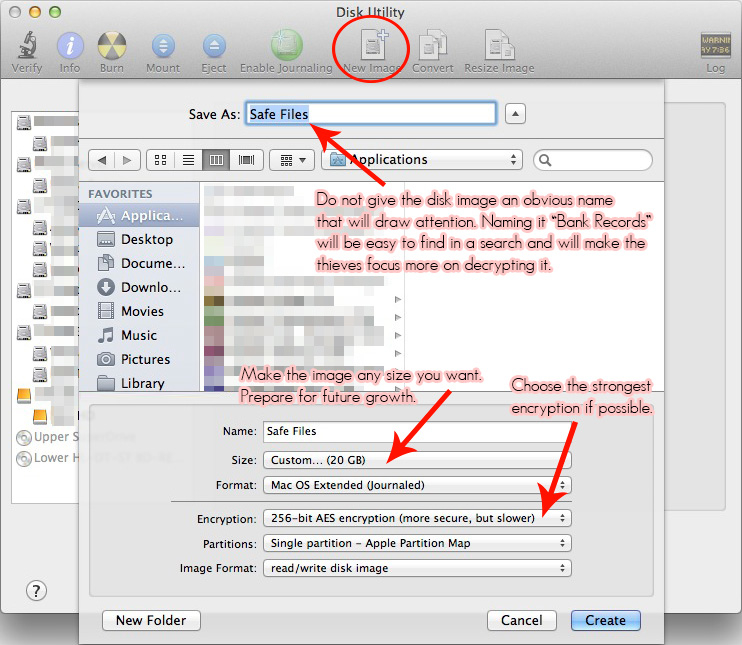
Strangers accessing your data is the main concern when your computer gets stolen. Making sure your sensitive data is properly encrypted should give you enough time to act. Even if the encryption can be broken, a properly encrypted drive or folder takes a lot of time to brute force, this will give you enough time to change all your passwords, call your credit card company etc. OS X’s built-in FileVault is a good way to encrypt your home folder or your entire hard drive. If you feel this impacts the performance of your computer (test it before you assume it will) then use Disk Utility to create encrypted disk images you can use to store sensitive data in. To do this, open Disk Utility and click on ‘New Image’. A new window will pop up as shown below.
Once you have set everything up, click the Create button. Create a password and wait for the image to be created.
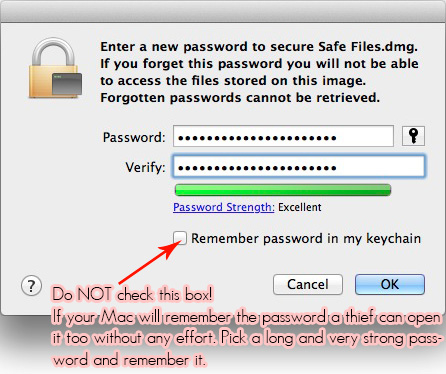
Of course make sure your password is strong. A short and/or easy password is much easier to crack and will render the strongest encryption fairly useless.
Whole disk or partition encryption
You can also choose to encrypt your entire hard drive. This can be done by enabling FileVault (covered in the first article of the “OS X Built-in Security” series) which will encrypt your whole startup disk but if you have multiple partitions or hard drives (both internal and external) then FileVault can’t help you as it only covers the startup disk or partition. This is where Disk Utility comes in, allowing you to encrypt select partitions, all partitions or entire drives. NOTE: To do this through Disk Utility the partition or drive you wish to encrypt has to be empty, if it is not empty then back up your data as Disk Utility will erase it’s contents. If you do wish to encrypt an existing partition or drive that has data on it and you do not want to back up, erase and restore the data, you can also use the Finder to encrypt. I will cover that method at the end of the article.
Select the disk or partition you wish to encrypt from the list on the left side of the window. Depending on your selection the options presented will slightly differ. If you select a partition you will see First Aid, Erase, RAID and Restore tabs in the right side of the window. If you select a disk, you’ll have the same tabs but also an additional one called Partition. If you only have one partition on your disk and intend to keep it that way, then use the Erase tab. If you wish to add more than one partition, then select the disk and use the ‘Partition’ tab. Once you create the amount of partitions you want, click each partition individually and then use the ‘Erase’ tab.


After you have selected a disk or partition you want to encrypt, click the ‘Erase’ tab. You can now select the Format, which will be ‘Mac OS Extended (Journaled, Encrypted)’ and you can select a name.
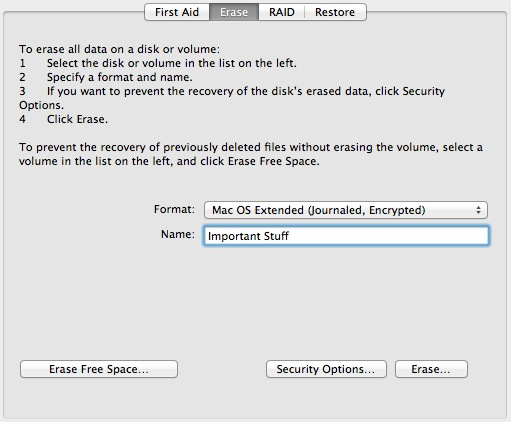
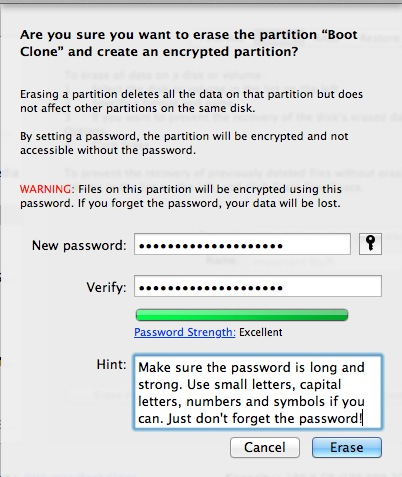
Once you are set (and are sure any data on the partition is safe), click the ‘Erase’ button. You’ll be presented with the password window. Set a strong password and if you must fill out a hint that will (hopefully) make you remember your password in case you ever forget it, make it cryptic and near impossible for anyone other than yourself to figure out. Keep in mind you will not be using the ‘Save password in my keychain’ feature later on as it would defeat the purpose of creating an encrypted disk, so please remember your password.
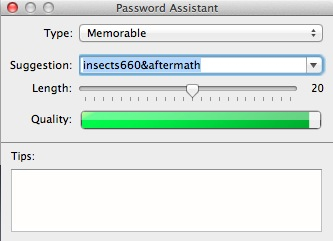
If you can’t think of a password that is both easy to remember and shows as being ‘Excellent’, click the little key button to the right of the first field. This will open a password assistant that can be very helpful. Play with the different type presets and length and keep an eye on the green bar below. More green = a more secure password.
Once you’re all done, click the ‘Erase’ button again and the 128 bit XTS-AES encrypted partition will be created and mounts on your desktop looking like every other drive or partition in your Mac. From now on everything you store to and from that disk will be encrypted and decrypted on the fly. The only time it will ask you for the disk password is when you start up your Mac, when it does, make sure you do not save the password in your keychain. This way, if someone ever gains access to your Mac somehow or remove the hard drive itself, they will not be able to mount that drive or partition. Keep in mind that once you unlock the drive, the data is accessible until you shut down or restart your Mac (internal drives) or physically disconnect (external drives). Setting a password protected screensaver is therefore highly recommended.
NOTE: Ejecting or unmounting an encrypted drive is not a secure way to prevent access! Using Disk Utility, anyone with administrator access to your Mac can mount the drive again without the need for a password, including other user accounts. I consider this a flaw in OS X but apparently this is how it’s supposed to function.
To secure drives:
– Restart the Mac
– Shut down the Mac
– Disconnect external drives
– Use password protected screensaver*
NOT secure:
– Switching users
– Logging out
– Use of password protected screensaver*
*A password protected screensaver only secures encrypted drives if there are no other admin user accounts on the Mac. Encrypted drives can be accessed by other admin users through Fast User Switching, Logging out and letting another user log in and clicking the ‘Switch User’ button in the screensaver password screen. If multiple user accounts are present, make sure they are all Standard user accounts and you have the only Admin account. If there are other admin accounts, consider using Disk Utility for whole disk or partition encryption, compromised. If other accounts are standard non-admin accounts though, you can still prevent those users from accessing the encrypted volume. To do this, right-click on the encrypted volume and select Get Info. At the bottom of the info window, open the Sharing & Permissions.
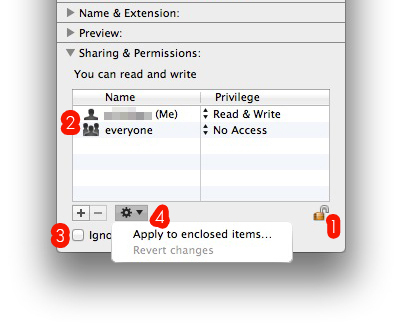
1. Click the lock icon and enter your password, you can now make changes.
2. The list should only have your name set to Read & Write access and ‘everyone’ set to No Access. Remove every other user.
3. Make sure the ‘Ignore ownership on this volume’ box is not checked.
4. Click the gear icon and select ‘Apply to enclosed items…’
Any other user account will see a blue folder icon with a prohibitory sign instead of the encrypted drive / partition. Perform these steps for each encrypted volume.
Mix it up
If you are not comfortable relying on just the disk encryption or have multiple admin user accounts on the machine, by all means use encrypted disk images as well. Imaging someone wanting access to your drive, they would have to break the encryption of the drive itself (which will take a VERY long time if you set a solid password and then they would have to try and break the encryption of your disk images which will take EVEN LONGER as you can use 256-bit encryption on those. (256-bit encryption is not available for whole disk encryption as it impacts speed and performance too much). As i understand, right now and for the foreseeable future it will take the best computers many years to break a 128-bit AES encrypted drive (again, assuming a very strong password), this time more than doubles for 256-bit AES encrypted volumes. First, someone would have to know exactly what data might be on that drive to make it worth the time and money trying to break the encryption and second, by the time they have cracked it (if ever) the data will no longer be relevant.
Want to really make someone that’s after your data break down in tears? Try this:
1. Encrypt a disk or partition.
2. Create 10 or 15 encrypted disk images, each 1GB in size using 256-bit encryption and name them 1, 2, 3 all the way through 10 (or however many you’ll create).
3. Store your important data in just one of the images or spread it out evenly across them all.
By the time someone will break the encryption on the drive itself and then all the images, trying to figure out which one has the data they are after… let’s just say the chances of that happening are extremely small. Also, to check log files to see which disk image you accessed most often and try to narrow down the search, they would need access to your startup drive which is also encrypted with FileVault (if you use multiple drives or partitions). You can think of other ways to make it damn near impossible for anyone to get to your data wether it be a thief or the NSA 🙂 Just remember it all stands or falls with the strength of your password.
Secure Erase (not needed on encrypted drives and not recommended for solid state drives)
With a disk or partition selected, click the ‘Erase’ tab, select a format, select a name and click the ‘Security Options’ button. This will give you a few ways to securely erase/overwrite the entire drive, making anyone unable to recover data from it. Select the second option to have the entire disk erased and then overwritten with zeros. While other options are available, using a 3-pass or 7-pass wipe will be a waste of time and electricity.
If you have a drive with data on it but want to make sure the history of the drive is unrecoverable, use the ‘Erase Free Space’ button. This will do the same as described above but will leave existing files in place and erases around them. In this window the first, default set, option is enough to make data unrecoverable.
This covers the security aspects of Disk Utility. Though the Finder is not related to Disk utility, i mentioned you can use the Finder to encrypt drives or partitions without having to erase them (a backup is still recommended). To do this, simply right-click on a partition and select ‘Encrypt *drive name*’, pick a password, set a hint and click ‘Encrypt Disk’. Two things to mention: 1. a recovery partition is needed even if the drive you are encrypting is not your startup drive and 2. Encrypting your startup drive through the Finder will enable FileVault.
Any comments are welcome.
1 thought on “OS X Built-in Security (4) – Disk Utility”