Using OS X Mail to spot phishing emails
 I have been using this trick for so long it never occurred to me before to write about it. Using OS X’s built-in Mail client you can spot fake (phishing) emails. This is not a tried and tested method and should not be used as your only line of defense against phishing emails but it has helped me spot phishing emails that were pretty damn good. Here we go.
For those unfamiliar with the term, a phishing email is a fake email trying to trick you into installing something, revealing information about something, getting you to enter your name and password somewhere or all of the above. Phishing emails can usually be identified by their obvious mistakes in spelling or grammar but the phishers have been getting better and better at it. This results in a phishing email from PayPal being almost indistinguishable from a real PayPal email and manages to trick many people daily world wide. I use PayPal as an example (and will keep using PayPal for the rest of this article) but of course these fake emails can pretend to be anyone.
If a phishing email is crafted good enough and does not raise suspicion, most people don’t even look at the sender address. If something doesn’t feel right though, most people will glance at the sender address and see that it did indeed come from ‘service@paypal.com’ but the sender address can be easily faked. Something that can not be faked though (or at least I have not seen this) are the headers, specifically the ‘Received’ header. This part of the header, hidden by default in Mail, shows where the email originated and what path it took to get to your inbox. Unless PayPal’s mail server was hacked allowing phishers direct access this part of the header can not be faked.
So, we can use Mail to set up some kind of visual alert that can tell us at a glance if a PayPal email really came from PayPal. It’s a bit of work but for me it has paid off quite a few times.
Create a folder
You can choose to leave all email in your inbox but personally I prefer my mail neatly sorted in different folders. In my case I have a folder set up for all my PayPal email. If you want a folder for whatever you are applying this article to (PayPal, Bank of America, mail from your boss etc.) now is the time to create it.
Gather headers
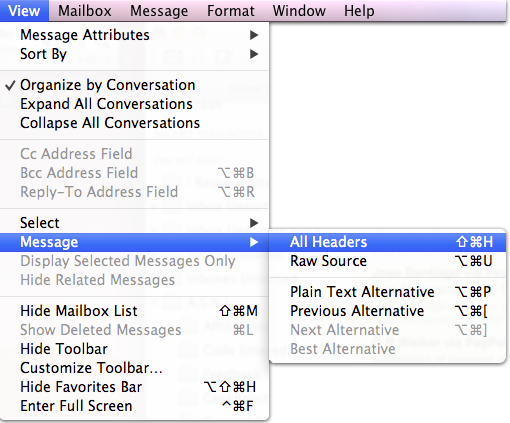
Find emails from PayPal, select them one at a time and from the View menu go to Message > All Headers.
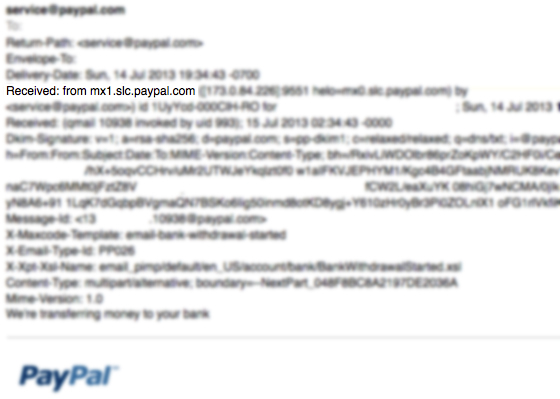
This will cause an extra block of data to be revealed on top of the email message. Focus on the line that starts with ‘Received: from’ and copy/paste this line into a text document. Select the word ‘from’ and the address that follows, don’t select anything that comes after like the IP address.
Do this for at least 10-15 emails and try to go back a few months to make sure you don’t grab headers from recent emails only. You will end up with a few different headers and some or most of them will be the same. In my case I sampled over 30 emails and ended up with this list:
from mx0.phx.paypal.com
from mx0.slc.paypal.com
from mx1.phx.paypal.com
from mx1.slc.paypal.com
from mx3.slc.paypal.com
from mx2.slc.paypal.com
from outbound.na.e.paypal.com
I previously verified all these emails to be the real deal so I trust this list to be actual PayPal mailservers. Sampling more emails will obviously result in a more detailed list but you can always add to this later.
Create filters
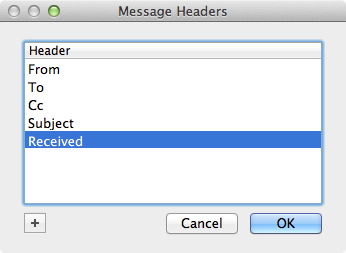
In Mail go to the Mail menu and select Preferences. Once there, select the ‘Rules’ tab on the far right. Now click the ‘Add Rule’ button. Make the description anything you like and move on to the first dropdown menu, default set to ‘Any Recipient’. Click on it and go all the way to the bottom of the list to where it says ‘Edit Header List’. Since the ‘Received’ header is not in this list by default you have to add it manually. A small window will pop up, click the plus button and add “Received” (no quotes, capital R). Then click OK.
Now you can start configuring the filter, or Rule as it’s called in Mail.
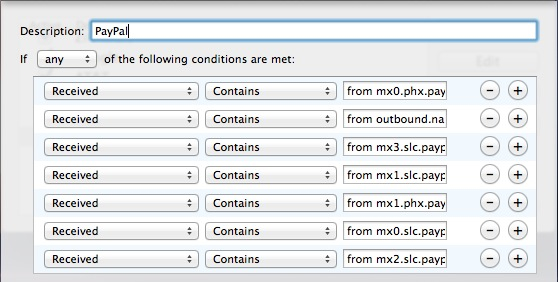
Set the first dropdown menu to ‘Received’, second menu to ‘Contains’, enter the first saved string in the text field and then click the round plus button to create a new line. Set the second line up the same way and enter a new saved string in each text field until you’ve covered them all. When you are done it will look something like this:
That took care of the conditions a PayPal email must meet. Now the actions that must be performed when one or more of these conditions are met have to be configured. This is how I configured mine:

I instructed Mail to move all messages that meet my set conditions to a folder names PayPal and to make the background of these emails green. When done, click OK and Mail will ask you if you want this new rule to be applied to existing mail, say yes. The result:
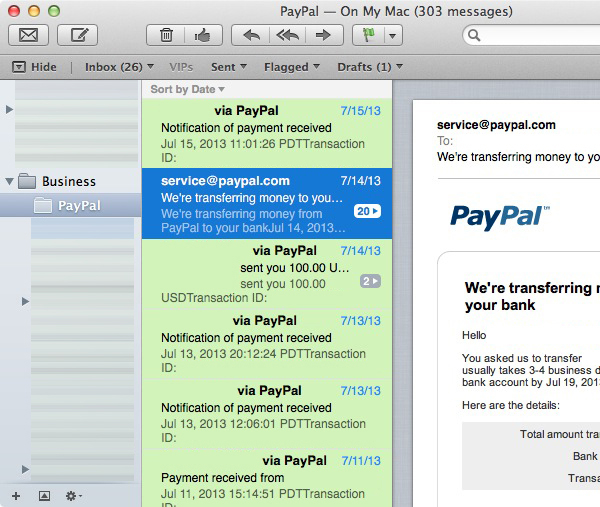
Every email from PayPal that is in this folder and has a green background came from a server that I trust to belong to PayPal. If none of the conditions are met the email will stay in my inbox until I inspect it. Once verified and trusted, I can add that email’s header to the list. This system does not mean you should stop inspecting emails, I use it as a way to draw extra attention to emails that did not get picked up by my Mail rules and like I mentioned, this has paid off in the past.
You can set these type of rules up for anything but as this requires some work I would focus on financial related senders (PayPal, your bank, Amazon, eBay etc.). Similar rules can be set up to help you with that annoying Junk Mail that keeps slipping through the cracks. If you have a lot of email these rules may not catch on right away or take a while to sort through your entire mailbox. To speed things up you can select all your messages, right click on one of them and select ‘Apply rules’.
For additional tips on how to spot phishing emails, have a look at the article I linked to a few times already in this post. You can find it here.
Any comments or feedback you have about this article is welcome.
There’s no need to build such a lengthy rule with so many specific server names. That is certain to result in failure at some point, as PayPal adds new servers. Any server ending in PayPal.com belongs to PayPal, and should be as safe as any PayPal server.
In addition, the issue with automated scripts like this is how they handle unanticipated events. For example, how would it respond if someone malicious sent mail from a server with an address something like mx0.phx.paypal.com.cn?
Thanks for the feedback Thomas, definitely valid points. I have found that using just “PayPal.com” it is easier for a fake email to slip through. This is how i initially set the rule up but then i got spam and phishing emails from “ns231957.paypal.com.ovh.net”. So making the rule more detailed left a lot less room for fake strings containing just that information.
I haven’t seen any spammer/phisher go to the effort of setting up a fake mailserver that is this detailed but if you really want to make sure the email originated from PayPal one could include the IP address in the rule, making it “from mx3.slc.paypal.com ([173.0.84.228″ (leaving out the port number as this changes often). I have not done this as I’ve found that just the server address is enough.
Still, spammers and scammers get smarter so who knows what will be possible for them down the road, maybe they will find a way to successfully fake the ‘Received’ header at which point this article becomes useless. Until they do this is a handy visual aid but by no means a substitute for properly inspecting emails to ensure they are the real deal.