Be sure you are prepared for iOS8
This exact article was published a year ago when iOS 7 was released. I have edited it where needed and republished it so you can be ready for tomorrow’s upgrade to iOS 8.
Tomorrow Apple’s iOS 8 will be available to the public. The next few days you’ll hear a lot of the following:
– I love it! It’s amazing!
– It’s great but….
– Where did all my *name data* go?!
– My *name app* doesn’t work anymore!
– My phone is messed up now!
– I hate it, I wish I could go back.
As always there will be people from all of the above camps out there. You won’t know what camp you’ll be in until you install iOS 8 so it’s important to prepare properly so you won’t lose data and/or can downgrade back to iOS 7. If you upgrade, love it and don’t experience a single issue, great. Then you’ll have done all of the following for nothing but hey, better safe than sorry 🙂 Let’s begin.
1. Backup to iTunes
iCloud is very convenient (both for you and all those that potentially have access to your data) but in the case of an upgrade it has it’s limitations. Once you upgrade, you can not downgrade and restore your data. The iCloud backup will not be compatible with an older iOS version so either stick with the latest or downgrade and lose all your stuff. If you backup to iTunes you have more flexibility to restore/recover data if needed and you can downgrade too.
Backing up to iTunes is easy and can be done even if you are already backing up to iCloud. Connect your phone to the computer and open iTunes. When your phone appears in the left column* right-click on it and select “Back Up”. You can also click the “Back Up Now” button in the main window.
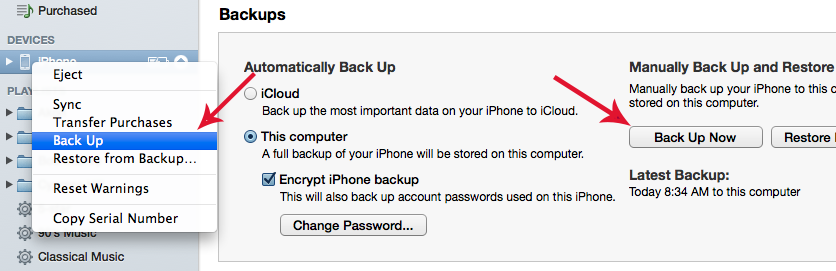
* If you do not see the left column (hidden by default in iTunes 11), go to the View menu and select “Show Sidebar”.
You can encrypt your backup too, for instructions on that have a look here.
2. Transfer purchases
Once the backup is done, right-click on your phone in the sidebar again and select “Transfer Purchases”. This will ensure that all your apps, music, TV shows etc. are saved to your computer.
3. Backup your camera roll
Open iPhoto and import all the photos from your phone. For many the photos are the most important data on the phone so make sure you have them all stored in iPhoto.
4. Lock your backup
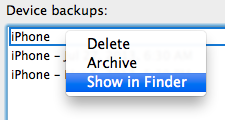
In iTunes, go to the iTunes menu and open the Preferences. Click on the ‘Devices’ tab and you should see at least one backup, the one you made earlier. If you have more, just look at the one with the most recent date. Right click on the latest backup and choose “Show in Finder”. This will open a new Finder window and your latest backup is highlighted for you. (Do not open and mess around in these folders as you could corrupt your backup). Now right-click on the highlighted folder and select ‘Compress “name of folder here”. This may take a few minutes depending on the size of your backup.
When backups are made in close succession the previous backup is usually overwritten. To make sure your iOS6 backup is not lost when iOS7 backs up, locking a copy of it away in a zip file is a good idea.
5. On your iDevice, close all applications and turn off bluetooth.
6. Upgrade to iOS 8!
Chances are you’ll love it and everything works fine. If for whatever reason you need to go back to iOS 7, unzip the file you created earlier and restore from that backup. Keep in mind that there are many developers out there still that have not updated their apps for iOS 8 so a crashing or strangely behaving app does not mean iOS 8 is causing problems. Check the support pages for the apps that are acting up and see if they support iOS 8 or if an update is on it’s way. If you really rely on an app then check this before upgrading.
Enjoy iOS 8!