Certificates
A Certificate Authority is something that’s known by all major browsers. If a certificate comes from a certain authority the browser knows “The authority trusts this server so I will trust it too”. By creating your own CA and signing all your other certificates with that CA, they will become trusted to all the machines that know it. So first we will create the CA and distribute that CA, or root certificate, to your other machines.
First, in the Server app click on ‘Certificates’ in the left column. You’ll see the “Secure services using:” is set to the default self-signed certificate. The window below shows Trusted Certificates and is currently empty. Click the gear button at the bottom of that window and select “Show all certificates”. The trusted certificates window now shows you the only certificate available. We don’t need the Server app until later so go ahead and minimize it.
Open up Keychain Access (Applications/Utilities folder) and from the Keychain Access menu select Certificate Assistant > Create a Certificate Authority. The Certificate Assistant will open.

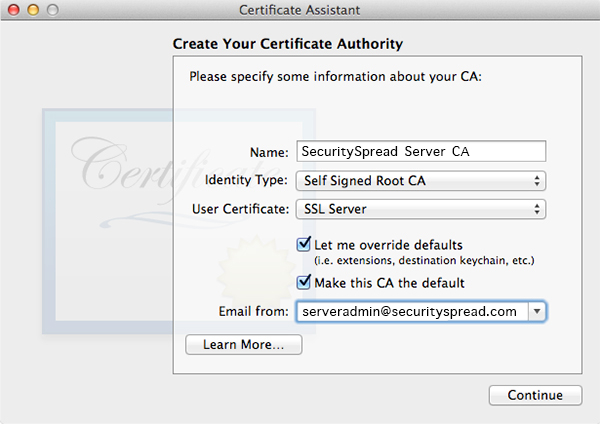
In the Certificate Assistant give it a good name and set it up as shown in the screenshot.
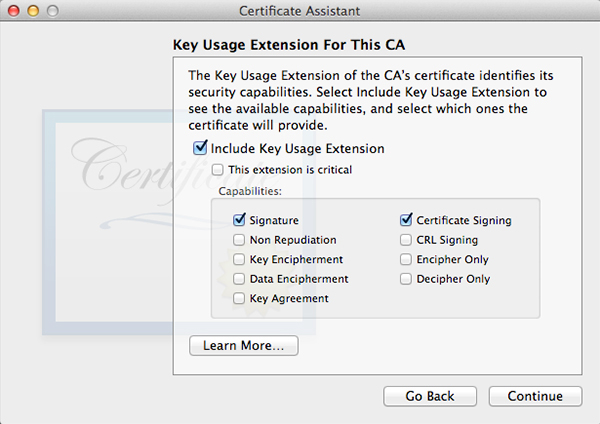
In the next window it will ask you for more details. The serial number is set to “1” by default. As to not cause any conflicts down the road I like to set this to something random and unique. The validity is set to 1 year by default, you can leave this or add more time. I set it for two years. Make sure to check the “Sign your invitation” checkbox as shown in the screenshot below.

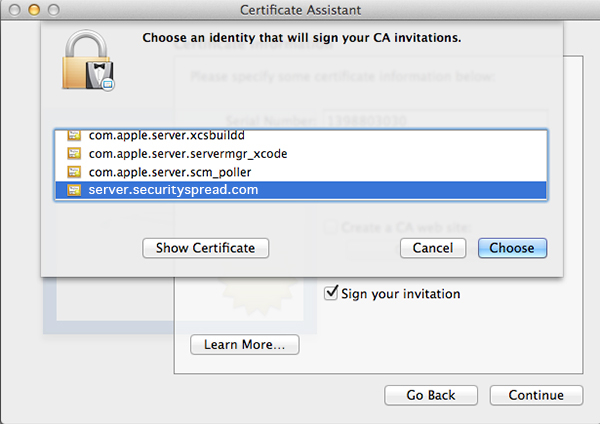
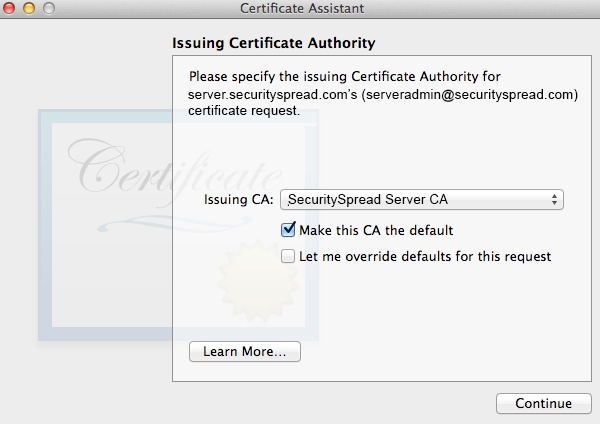
When you click Continue it will ask you for a certificate to sign with, select the one you saw earlier in Server app as your default.
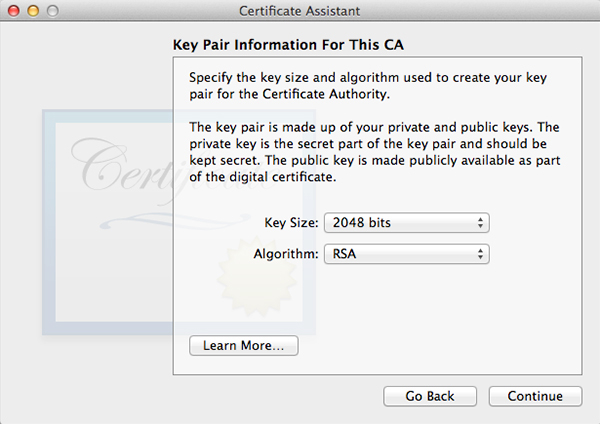
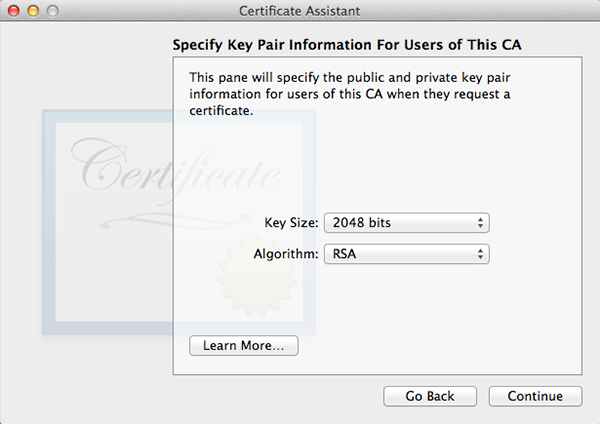
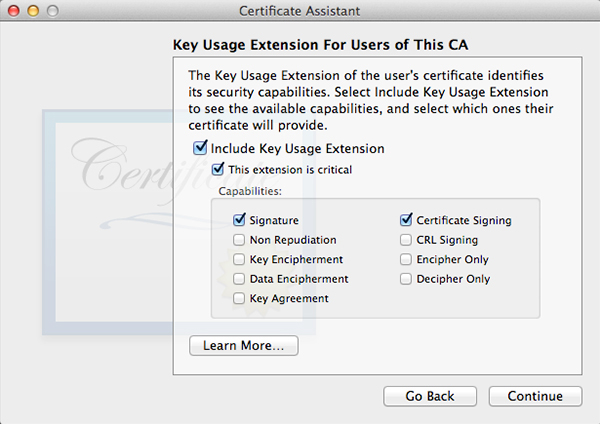
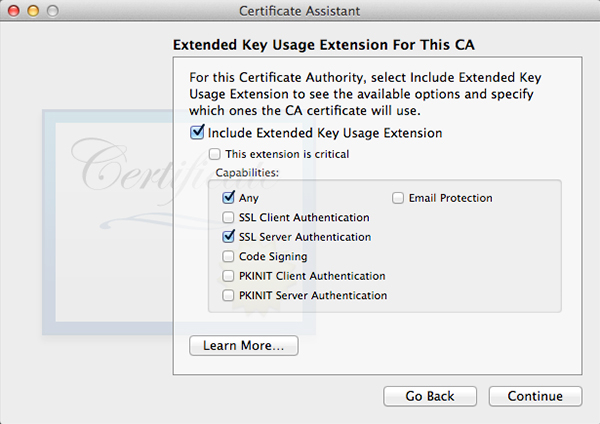
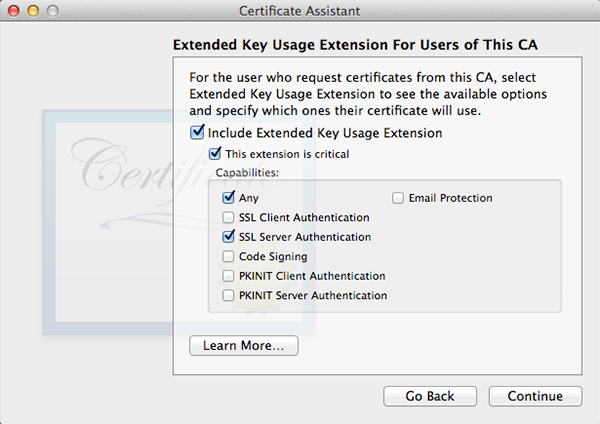
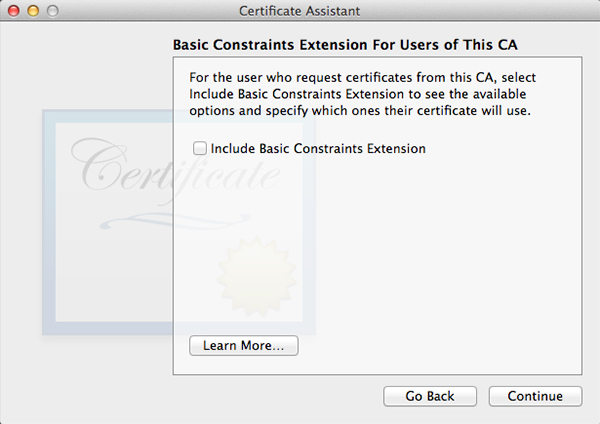
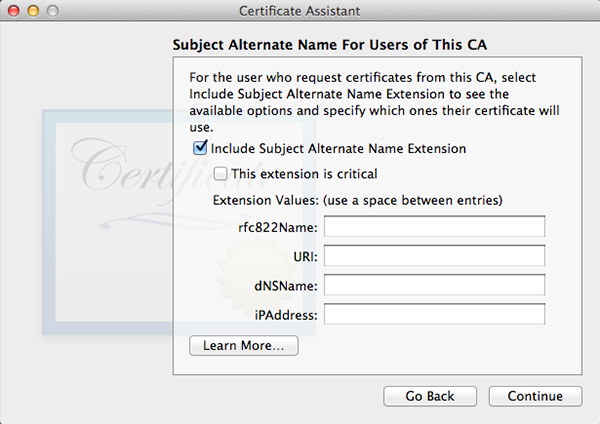
Click Choose and fill out all the requested information in the next window. The window after that will let you set encryption strength and algorithm. The default values will do fine. Keep in mind the next few windows will look a lot alike but they are not. Follow along in the screenshots below and copy the settings.


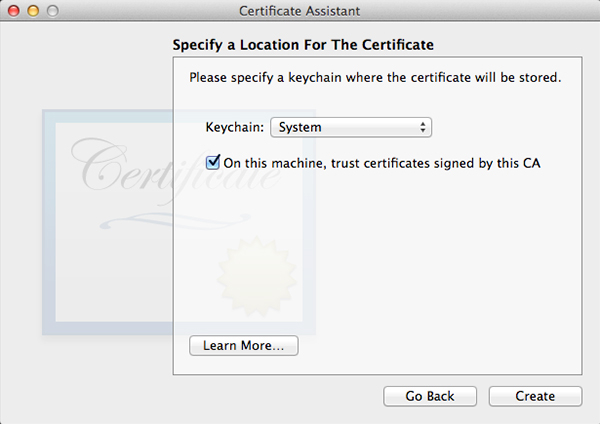
When all done, click Create. A Conclusion window will show, do not close this window yet.
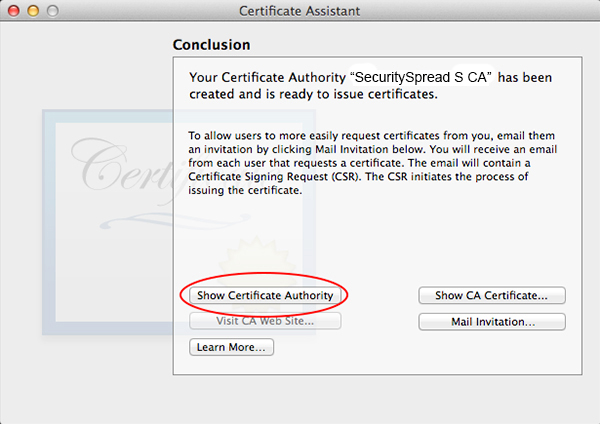
Click the “Show Certificate Authority” button and you’ll see a Finder window with two files in it, one of them a gold certificate icon with a .pem extension. This is the file you have to securely transfer to your client machines. Once your client machines have this CA installed they can validate the certificates your server hands out every time you connect. This also greatly reduces the chances of a succesful man in the middle (MitM) attack. If this CA is installed on your machine and you receive a certificate warning, you know something is wrong rather than guessing everything is alright and dismiss it as you usually would. If this CA certificate falls into the wrong hands however someone could definitely pretend to be your server and intercept traffic that is supposed to be secure. So when you transfer this make sure you use a safe and secure way. On your local network this can be done with AirDrop and if you want to send this to a remote machine use Apple Remote Desktop with encryption enabled or another way that offers encryption.
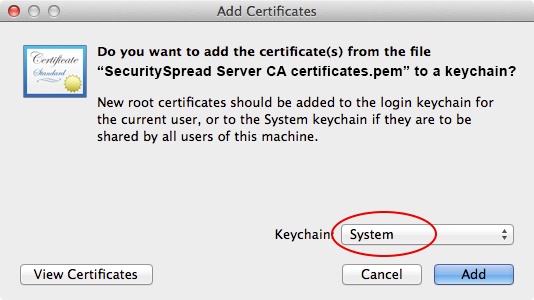
Once the file is on the client machine, just double-click it top open Keychain Access. You’ll be presented with the following window, make sure you select the System Keychain.
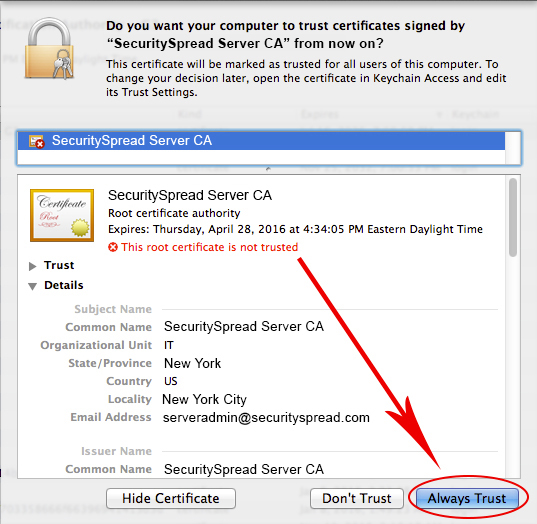
Once you click ‘Add’ a confirmation window will pop up. Use this window to verity all the CA details specially if you sent the CA file off to a remote client, just to make sure it was not tampered with. Notice it tells you “This root certificate is not trusted”. You’ll change that by clicking the “Always Trust” button. From now on every certificate signed by this CA is trusted.
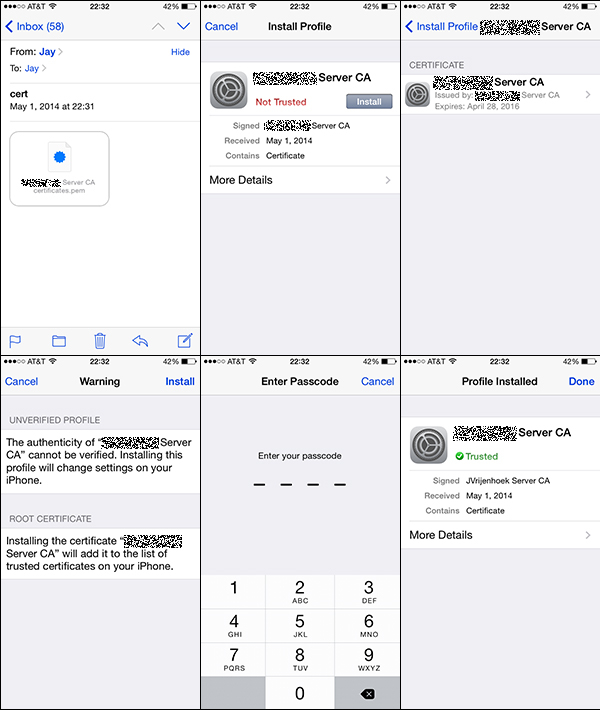
On an iOS device installing the certificate will look something like this:
Alright, you’re half way there! With the CA created and in place on your client machines close all the keychain and finder windows as we won’t need them anymore for now. Open the Server app again and you’ll notice the Trusted Certificates window now has two certificates in it. One with the default name (usually your host name) and one with the name you gave the CA. The settings will still show services are secured with the default certificate and that’s ok. We’ll work on that next.
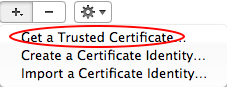
While still in the Certificates window of the Server app, click the gear button down at the bottom and select “Get a Trusted Certificate”.
You can create one certificate for all services or create a new certificate for each service. In this case I will create a default certificate but in the future I may add a wiki.securityspread.com certificate if I decide to start a wiki. Fill out the details in the window that opens.
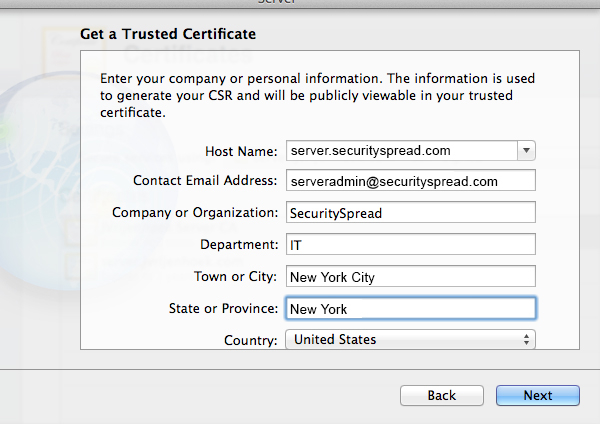
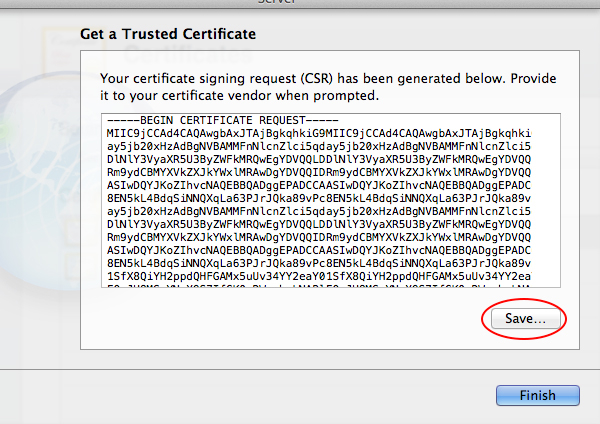
When you click the Next button you’ll be shown the certificate signing request or CSR. Save this file to your desktop with the default name it provides. The file will show as a plain white document with the .csr extension. Click Finish.
In the list of Trusted Certificates you’ll now see a pending certificate.
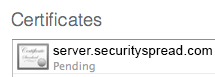
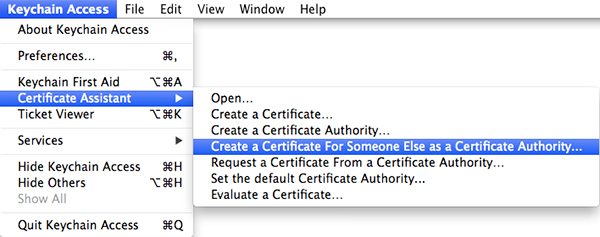
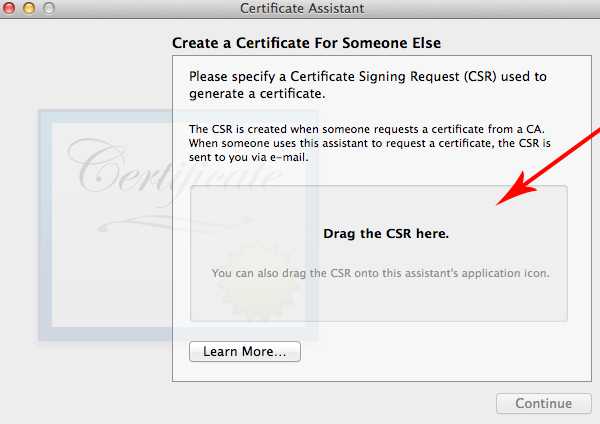
The new certificate is waiting for you to send the CSR file to a Certificate Authority and have it turned into a real, valid, certificate. Until this is done what you have ‘pending’ is more of a placeholder than an actual certificate. This is the part where you pay a CA $30 – $100 a year to have them do this for you. In this case you have a CA that’s completely free, your own! To create the certificate, open up Keychain Access again. From the Keychain Access menu select Certificate Assistant > Create a Certificate For Someone Else as a Certificate Authority.
In the next window, drag the CSR file you just saved on your desktop into the space asking for it and click Continue.
Once the certificate is created, Mail will open. The new message that is created will have an attachment in it named “certificate.pem”. Save this file to your desktop and close Mail. You’ll see this file as a blue certificate.

The conclusion window will show you the created certificate and it will also tell you “This certificate is valid” since it was created with a CA your system trusts. Close Keychain Access and go back to the Server app where the certificate you created is still pending. Double-click the pending certificate and it will as you to drag a .pem file in. Use the one you just created and placed on your desktop. We have now come full circle! The Trusted Certificates window will now show three entries. The CA, Your new (valid) certificate and the default self-signed certificate.
At this point you can delete the self-signed certificate (the one showing as a gold icon) and set the “Secure services using” to the new (blue icon) certificate. With the root certificate (CA) n your client machines and the server using a valid certificate created by that root, you have SSL security that is just as good as those you pay for and it is perfect for home or small scale use.
<- Page 3, Basic Setup || Page 5, Open Directory ->
(Page 4)
This article was a reassuring resource as I attempted to get my Mavericks server up and running with reasonable SSL protection.
I’ve still got some issues with iPhones whining about stuff that a Mac handles adroitly, but I’m a lot closer.
Thanks.
I followed all of the steps up to the very last one, but when I drag the .pem file onto my pending certificate in the Certificates window, I get this message: The imported certificate does not match any private key in the keychain. The certificate will not be available for securing services. I am trying to set up my Mac OS X Yosemite Server for my classroom and I am new to this. Are they now blocking this method for creating certificates? I cannot set up my devices (iMacs running Yosemite in my classroom) using Profile Manager. I keep getting not trusted server messages. This is my first experience with Profile Manager.
Scott, have you tried to create your own certificated like this before? There might be old certificated with the same or similar information in your system and user keychain that cause issues. Go through your keychain and remove any certificates you created or that have expired and are no longer in use, then try again. I used this method just last week on an OS X 10.10.4 Server so it still works.
Thanks for responding. I am so new at this certificate thing. Didn’t need it with my old server setup (at least I didn’t need to set them up). I seem to have numerous certificates in the system level of my keychain. Five start with APSP and then have many letters and numbers (almost like a password code). I have many four that start with com.apple, two that are blue and two that are gold with blue + symbols and one that starts with IntermediateCA_(server name). Which ones can I delete that won’t blow up my server?
Thank you for your help and expertise.
Scott, focus on the certificates that have your server name in them. If it’s a LAN server only then they’ll be named something like classroom1-server.local (whatever your Machine’s name is). If you have the server set up on a domain then look for that domain name instead. Do make sure you leave the self-signed or fallback certificate in place though. This is the one that was automatically created when you set up the server. You can find out it’s name by checking the “certificates” tab in Server.app, it should be the default certificate used by services now. I assume you have a backup of the server in case you do blow it up? 😉