Setup: Time Machine
You’ll find that you can only set up Time Machine settings per device or device group. If you want to set per-device size restrictions don’t use a group to set up Time Machine. As users may be signed in to iOS devices as well the setting for Time Machine is not available in the user settings.
Select your device or device group in profile manager, go to Settings and click Edit. Find the Time Machine service and configure it. I have found that the example URL apple gives for this service does not work, for me at least. Also some additional steps are required to make this service work. I’ll cover all of it on this page. If you only have a few Macs to set up and don’t mind setting up each one individually then use the Time Machine control panel in System preferences. Click select disk, choose the server Backup drive, enter name and password and it’s done.
However if you want to use Profile Manager because you have more devices to manage or like automation, read on.
Set up the Time Machine profile as shown below, make sure to use a capital ‘B’ for ‘backups’ at the end of the URL. If this is a small local environment you can also use the IP address of the server instead of the domain name. If you’re having issues using the full domain name you may also want to add your server IP to the DNS settings as described at the bottom of this page.
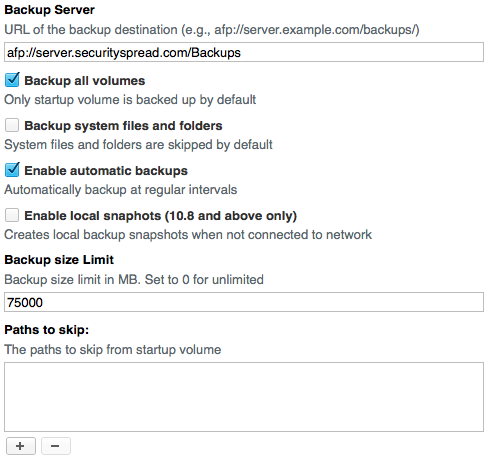
These are the settings for my MacBook Air so I set a limit of 75GB for it’s backup. You can leave this field blank if you want to go with unlimited space or for it to follow the global size restrictions you set earlier. With these settings pushed out to your clients you’ll find the service is not functioning. You have to prompt the client to connect to the backup drive separately. To do this go back into settings and find the ‘Login Items’ option. Configure it and add an “Authenticated Network Mount”.
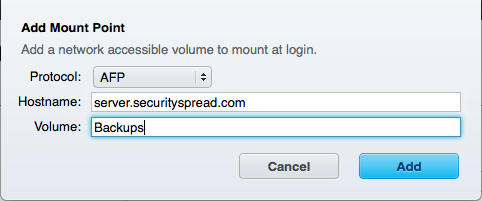
In this case do not add a protocol like afp:// or any forward slashes. The service will do that automatically. Click ‘Add’ when done and click the ‘Hide’ checkbox in the resulting window. When done click ‘Save’ and push out the settings.

Restart your client machines and you should be prompted for a username and password. Enter it, remember it in the keychain and your Time Machine should now be fully functional. I don’t know why a way to authenticate users is not built in to this profile like it is with Contacts and Calendars but this is a nice workaround. I spoke with Apple Enterprise Support and after several hours of testing and experimenting we agreed this is the best solution.
Note: On systems running 10.9.3 the Backups drive may show on the desktop even though we told it to be hidden. Not sure why but this should be addressed in future updates as it does not happen on 10.9 – 10.9.2.
At this point Software Update, Contacts, Calendars, Reminders and Time Machine should be set up on all devices.
<- Page 14, Setup: Calendar and Contacts || Page 16, Setup: VPN ->
(Page 15)
This still did not work for me. I really wish it would. Using your advice the client would mount the afp://share fine on reboot, but time machine wouldn’t recognize it was connected. I read somewhere else that this is because time machine needs a System keychain password vs the user one provided to log in with the finder. Not sure. Anyways only way I could get it to work was if I log in with each client’s time machine under the system preferences and then apply the settings through profile manager (so at least the size limits and paths to skip work). Only thing different I’m doing from your example is using a static IP address instead of server name/address. If you can share any other advice that would be great. Certainly not as straightforward as I would prefer it to be.