Setup: VPN
I would like access to my shared folders when I am away from home as well. However AFP is a highly insecure protocol so rather that connecting straight to “afp://server.securityspread.com” from a remote location I use a VPN. File sharing does not use SSL certificates like the other services so a VPN ensures the connection to the server and the file transfers are secure. I also purposely closed the AFP port on my router and firewall to make sure I can’t accidentally connect without the VPN connection enabled and of course to keep others from exploiting a hold in the firewall that connects to an unsecured service. Once the VPN connection has been established I can connect to my shared folders as I would on the local network.
First, enable the VPN service by flipping the switch to ‘On’.
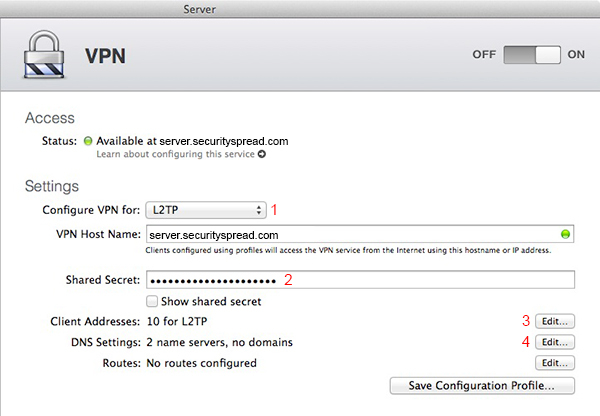
1. Make sure to configure VPN for L2TP, not L2TP and PPTP
2. The shared secret is auto-generated (click the box to see it), I prefer changing a few of the characters and adding some too. This just in case the random code generator used to create this secret is flawed (it happens).
3. This allows you to set how many IP address are generated for connected clients. If it’s only going to be you, set it to 2 (one for you and one just in case you connect from another location while you are already connected. Office and Starbucks for example). Don’t allow more than needed.
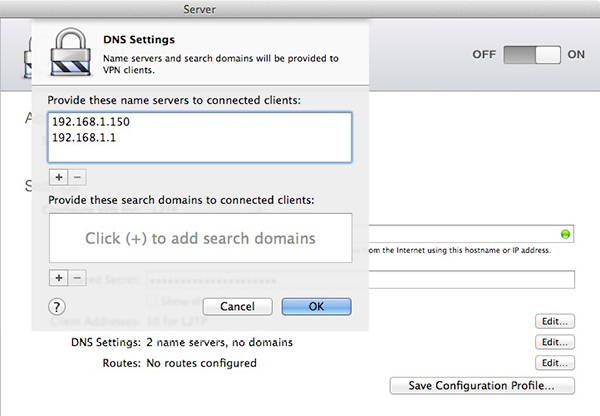
4. For connected clients to be able to lookup your server address faster, it helps if you add your server IP as a name server. Make sure to add your server’s IP first and then add the default 192.168.1.1.
That’s it, the VPN service is configured and ready to go. Now you just have to get the VPN connection and login details to your clients. You can save a configuration profile and send that to clients but since the Profile Manager service is already running it will be much easier to use that instead.
Open up the profile manager webpage and select the device or device group you want to install the VPN details on. Go to Settings, click edit, find VPN and configure it (I’m assuming you have the hang of Profile Manager by now). Configure it as in the screenshot below.
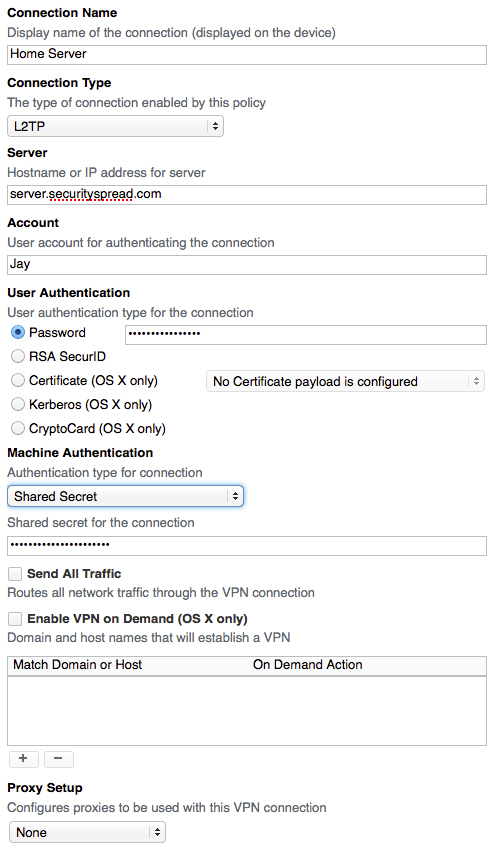
Pretty self-explanatory. When done, save the changes and push it out to your client(s).
On the client machine go to System Preferences > Network and you’ll see the VPN profile added to the list of interfaces, click on it for more details. I prefer to have easy access to the VPN so I check the box “Show VPN status in menu bar”. This enables you to quickly connect and disconnect from the VPN. On my laptop I clicked the ‘Advanced’ button and set it so that all traffic passes over the VPN. I use this when I am on a public Wi-Fi. Keep in mind you need moderate to strong internet connection at home for this.
Once the VPN is connected, click on the ‘Go” menu in the Finder and select “Connect to Server”. You can also hit Command+K on your keyboard. Enter your server’s address “afp://your.domain.com” and click connect.
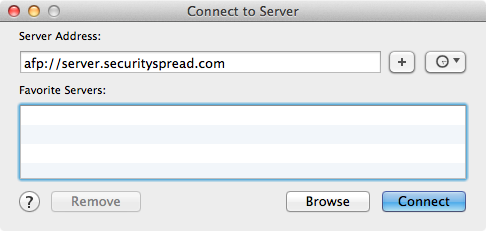
Depending on the speed of your connection (both at home and in your current location) you may see a progress bar pop up for a while. Eventually you’ll see your shared folders. If you or other clients can not connect, make sure their user is allowed to use the VPN service.

All done!
At this point Software Update, Contacts, Calendars, Reminders, Time Machine and VPN should be set up on all devices.
<- Page 15, Setup: Time Machine || Page 17, TBA ->
(Page 16)
I came across your magnum opus on Server by accident. It’s really great, thank you for this very much! Time has been fairly kind to this ‘manual but we are now on Server 5.6, on High Sierra some of the services have moved out of server and into the OS and Apple is busy walking away from Server as we know it. Is this an opportune time to revisit this tutorial and bring it up to date? Most of it is still relevant- afp has more or less gone away but much of the rest seems much as I see it in the current version even if some of the services have to be uncovered. The thing that has drawn me to Server is largely what seems to have drawn you- a desire to have cloud like syncing services but on your own terms and under your own control. Do please revist this turotial!
It’s on the to-do list but finding the time is very tricky these days. Haven’t forgotten though Thanks for visiting!