Software Update
This service is only useful if you have multiple Macs on your network so if this is not the case for you, skip ahead to the next chapter. The Software Update service picks up where the caching service left off for OS X. Any system updates available for your Macs will be downloaded by the server first and then made available to your client machines on the network. The biggest benefits are speed and bandwidth as the update only has to be downloaded from Apple once, after that the local network handles the rest. If you are an administrator you’ll like this service as it enables you to select which updates will be available to your network and which will be disabled until you confirm all the software is compatible. Maybe department X needs the latest printer driver updates, maybe department Y does not etc. You can manage that with profiles and groups later on if you want. For home use it’s nice as software updates can easily be a few hundred MB large and most internet service providers (ISP) still enforce some kind of monthly data limit. Having to download the 10.9.2 update once will use 1.23GB, downloading it for 4 Macs in the house uses almost 5GB. A simple printer software update can be as high as 1.2GB and a security update almost 200MB, just to give a few examples.
Setting up the Software Update service is a breeze but some more configuration is required on the client machines to make sure they check your server for updates, not Apple’s server. Unfortunately the Software Update service doesn’t work as smooth as the Caching service. Devices on your network simply ‘know’ a caching server is present but they have to be ‘told’ about the software update server. Not sure why this is but configuring client machines is pretty straightforward.
Think you need the Software Update service or simply want to try it out? Get started by flipping that switch to “On”.
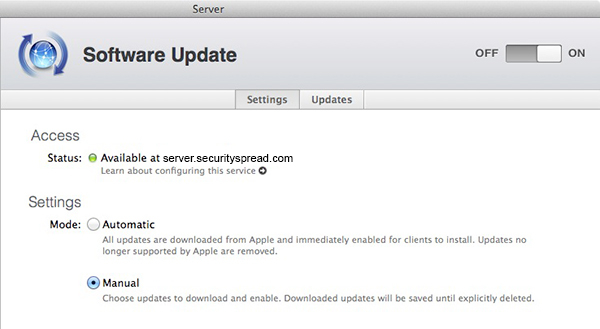
Set the Mode to ‘Manual’ for now. Unless you have plenty of storage and no monthly data limit from your ISP I do not recommend ever using the ‘Automatic’ mode. Next click the Updates tab and you’ll see a blank window. As far as I can tell the service checks for available updates once or twice a day but right now to speed things up a little, click the gear button at the bottom of the window and select “Check for Updates”. This can take quite some time as the service will retrieve a list of update as far back as 2005. After some time you’ll be presented with that list, click on the date column header to see the latest updates first:
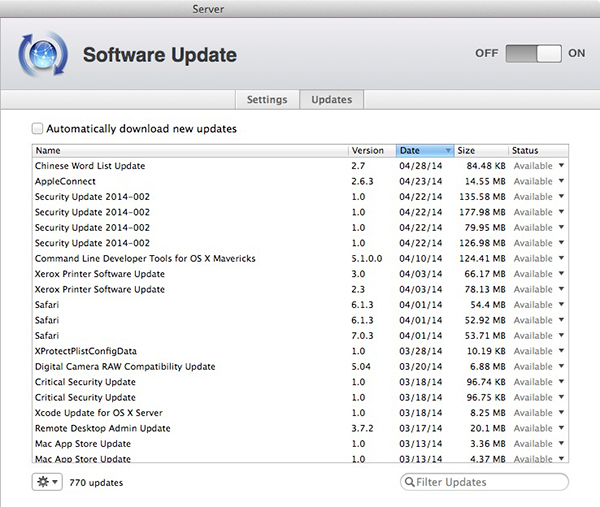
Double-click on an update to see all the details about that update and enable it as an option for your network clients. You can also click the ‘Available’ status in the list of updates and select “Download” or “Download and Enable”. I suggest you keep the “Automatically download new updates” box unchecked as it will download ALL updates and enable them too. This can take days and will fill up your hard drive until there is no space left.
The Software Update service will check for available updates every day and list them, it just won’t download them until you tell it to. Check this window daily for new updates and enable the ones you want for your network.
Now you’ll need to configure your client Macs so that they will contact your server rather than Apple’s server for updates. This can be done in a few different ways but I will only cover the easiest way and explain the alternative methods at the very end of this page. I’m about to show you the manual way of doing this. These steps have to be done on each Mac. You can also use Profiles to set up all of your Macs simultaneously. If that sounds good to you, skil the rest of this article and move on to the next page.
On your server, in the main window click on “Server” at the very top of the left column. Notice and remember the Computer Name. In my case this is simply “Server”. On your client Mac, open the Terminal app (Applications/Utilities). Type in the following text exactly but replace ‘server.local’ with the name of your server and add ‘.local’:
NOTE: You are about to use the terminal with root privileges, it is recommended to have a full and up to date backup of all your data before proceeding.
sudo defaults write /Library/Preferences/com.apple.SoftwareUpdate CatalogURL http://server.local:8088/index.sucatalog
Hit return when done. To verify the new setting was successfully saved, type the following:
sudo defaults read /Library/Preferences/com.apple.SoftwareUpdate
Hit return when done and you should see something like this:
{
AutomaticCheckEnabled = 1;
AutomaticDownload = 1;
CatalogURL = “http://server.local:8088/index.sucatalog”;
ConfigDataInstall = 0;
CriticalUpdateInstall = 0;
DidRegisterLocalUpdates = 1;
IgnoringUnseenRamped = 0;
LastAttemptSystemVersion = “10.9.2 (13C1021)”;
LastFullSuccessfulDate = “2014-05-04 02:06:16 +0000”;
LastRecommendedUpdatesAvailable = 0;
LastResultCode = 2;
LastSessionSuccessful = 1;
LastSuccessfulDate = “2014-05-04 02:06:16 +0000”;
LastUpdatesAvailable = 0;
PrimaryLanguages = (
en
);
RecommendedUpdates = (
);
SkipLocalCDN = 0;
}
Your client Mac will now always look to your server for the latest updates so make sure you set the Software Update service to automatically download new updates. If bandwidth or data restrictions are an issue keep automatic downloads off but check for updates manually daily.
Finally you can type the following command to see if updates area available already:
sudo softwareupdate -l
Results will most likely be:
“No new software available.”
Running Software Update from the Apple menu or the App Store should result in the same.
If it doesn’t work or you want to check for updates on Apple’s server like you used to, set the default setting back by running the following command:
sudo defaults delete /Library/Preferences/com.apple.SoftwareUpdate CatalogURL
Instead of your local network name you can also use your domain name like server.securityspread.com:8088 but this requires your Mac to know where that domain is. It knows how to pull up the website in a web browser but with port 8088 added to it, it no longer makes sense. For your local client to know where the software update service is located you have to add the IP address of your server to the DNS settings. To do this go to System preferences > network > select Wi-Fi or Ethernet (whatever you will be using) and click the ‘Advanced’ button. Find the DNS window and add your server IP address there. It should already have an IP address in the window, most likely 192.168.1.1, that will automatically be erased as you add a new IP. Make sure you add that IP back to the list so it will show your server IP and the default IP that was there.
There is room for error and quite a few more steps are required to set the software update address this way, that’s why I prefer to use the local network address (.local). I’m not sure how this will work in large networks but for me it works just fine on a network with roughly 30 Macs.
All set. Moving on to Time Machine.
<- Page 8, Mail || Page 10, Time Machine ->
(Page 9)