Everything you need to start PGP encrypting your OS X Mail
PGP (Pretty Good Privacy) is a way to encrypt data. It can be used to encrypt hard drives or to hide the contents of an email message from prying eyes. To read the ins and outs of PGP have a look at the Wiki page here. PGP is not just one product, its an encryption system that is used in a range of products but I will be talking about GPGMail, an extension for OS X Mail that allows you to digitally sign, encrypt and decrypt email messages. It’s open source (so it’s free) and has come a long way since it’s inception in 2001. In the past this was difficult to install, set up, understand and usually broke down as soon as OS X was updated. The latest version of GPGMail states this is no longer an issue. “Our existing users know this problem all too well. A new minor update of OS X is released, and GPGMail is automatically disabled. No more! GPGMail will fix itself and just keep working.” So I gave it a try. An update that was released as I was writing this article seems to confirm they are on top of things now.

With the recent focus on email and our understanding that email, by design, can not be completely private and secure. GPGMail, preferably combined with using a reputable email service provider that will do it’s best to protect your privacy, is a good layer of protection to have.
GPGMail’s cryptographic power comes from GnuPG, a GPL Licensed alternative to the PGP suite of cryptographic software and makes it fairly easy to make this cryptography available to everyone. It wasn’t always this easy, even the inventor of PGP encryption Phil Zimmerman said he does not use PGP to encrypt his email because it just doesn’t run well on a Mac. Maybe he has not tried GPGMail yet? Well I have and must say it integrates nicely and once set up it runs smooth.
 To get GPGMail go to this website. GPGMail is part of a larger suite “GPG Suite” which offers a few more tools. Save the downloaded installer file as it contains the uninstaller as well. The uninstaller needs a lot of work as it is extremely buggy and not likely to work (even with the help of online instructions) but in case you need it, it’s best to have it just in case. Manually uninstalling GPGMail is fairly straightforward so this is always an option if the uninstaller fails. Once you have downloaded the installer, fire it up and follow instructions.
During the installation have a look at the Installation Type window and click the “Customize” button. This will allow you to select just the components you want to install. Highlight a component to see a small description of it at the bottom of the window. I recommend installing all components but if you want to keep it as light as possible without losing functionality then disable “GPGServices”.
With the installation done, open your Applications folder and look for “GPG Keychain Access”, open this up. You’ll be asked to generate a new key pair and this is usually where most get confused, cancel because they are afraid they will mis-configure something or cancel because they do not understand what’s going on. Relax, it’s easy! The key pair you are about to generate will be your public key and your private key. The public key is the one you hand out to people, they need it in order to send you encrypted emails, without it they can’t as your public key is used on their end to encrypt the email. It is safe to hand the public key out because it is worthless without the private key linked to it. The private key will handle the actual decryption of encrypted emails you receive and is stored only on your computer so it is very important you properly secure your computer (think screensaver password, disk encryption etc.) to make sure this private key never falls into the hands of a 3rd party.
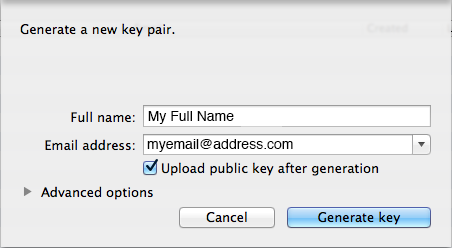
The full name can be just that, your full name, but it can be anything you like. If you upload your public key to a keyserver after it’s generated your actual full name can help others find you and make sure they get the right key that belongs to you. If you are not worried about that and/or will be handing out the public key through other means then you could fill out “Mickey Mouse” if you want. You can generate keys for every email address you have or combine multiple email addresses in the same key, for now pick one and remember which one you picked. The default settings are good and will create a key with a length of 2048bit. 2048bit encryption is pretty damn strong and, to their knowledge and mine, has not been compromised (broken). If you want an even stronger key though, click on “Advanced options”.
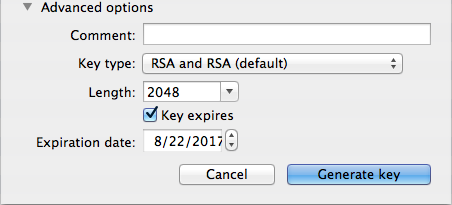
GPGTools recommends you leave the comment field blank, so we will. The key type is best left to it’s default as well and the length is where you can set the key strength as high as 4096bit. While 2048bit encryption may not have been broken yet, it may be broken in the future. We all know now that the NSA and other government agencies collect and save encrypted data for later analysis and possible decryption so if you want to make sure your stored email is not compromised anytime within the next few decades you could choose 3072 or 4096bit. If the goal is to just keep hackers, crackers, wifi snoopers and system administrators from reading your email content then 2048bit is enough to keep them busy trying to decrypt it for the next few hundred years. The key is set to expire by default in 4 years from the moment you create it. Key expiration is a safety measure in case you ever lose your passphrase and the ability to revoke the key. You can change the date or disable expiration if you want to. I’d leave it set to default values unless you plan on doing some whistleblowing then you may want to change this to 1 year or less.
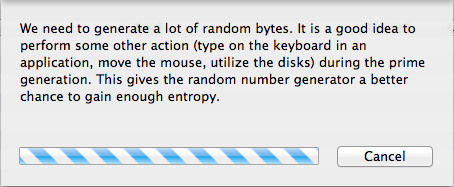
Click “Generate Key” and you’ll be presented with a progress bar explaining what’s going on. Read this carefully and do as it says, it will help generate a stronger key. At the same time you’ll be asked for a passphrase, it’s very important you choose a long and strong passphrase. No need to rush it, the key won’t be generated until you choose and enter the passphrase. Once done, confirm the passphrase and perform those other actions that were mentioned in the progress window. Depending on the key strength and the speed of your processor this can take a minute or so.
Voila! You have created your key pair and are ready to receive encrypted emails. You still need to send your public key to other people so that they can actually create encrypted emails to send to you.Your public key can be obtained in a few ways.
1. Tell the other person to look for your name or email address on the key server (if you uploaded it to one). While in the GPG Keychain Access application type Command-F or go to the Key menu and select “Search for Key…”. When they type in your full name or email address your key should pop up and they can import it. When using this method it’s a good idea to compare key fingerprints to make sure both parties have the actual key (there are fakes out there). You can get the fingerprint of your key by double-clicking on your key in GPG Keychain Access, this will open up the ‘Key Inspector’ window. About half way down you’ll see a 40 character string of letters and numbers divided in groups of 4, this is the fingerprint. Compare this with the other person.
2. Export your public key from the GPG keychain access application. Then send the exported file or extract the key from it and post it/send it. Here’s how to do it. Open your GPG Keychain Access application and find the entry marked in bold text, it’s the one you just created. Right-click on it and select ‘export’.

In the next window you can give the exported file a name and tweak some settings. There is one setting in particular I want to mention and this is the checkbox at the very bottom “Allow secret key export”, do NOT check this box. You do not want your private key exported to the same file. Leave the format as ASCII and save the file.
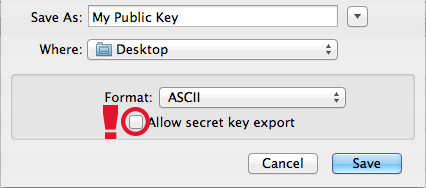
 You now have a .asc file that you can send to other people but they will need software that can open this file (like GPGTools). If you want to publish the key on a website or paste it in plain text in an email to multiple people for example then extract the key from this file first. In case someone that wants to send you an encrypted email does not have software that is able to open .asc files and/or uses a different PGP software I prefer a plain text distribution. So to extract the key from this file just right-click on it and open it with TextEdit (if TextEdit is not an option select “Other” and select TextEdit that way). And finally, there it is, your Public Key! It’ll look like this:
—–BEGIN PGP PUBLIC KEY BLOCK—–
Version: GnuPG/MacGPG2 v2.0.20 (Darwin)
Comment: GPGTools – http://gpgtools.org
mQINBFIVuiABEAC58tCLErSF/YkIaVRxRCQaqg2Ferzy7Mi55AYzvnNzupD5sf0M
RpaiOEMDBdHPd+/nY880smrOYKIfvh9rj/rARmu6E0tM/ml2OKm9JZdG8G4SrhDh
PIPaRXXx/F9JEejDLmKttqYRWvt9GqpCWpYshJRyF8hTVMEGCZR7PyVebI0ch0DV
07npwz8YK4YGC3R+MaxIafFcW9HjDiLvBHZQbuxVy2CQj+kRohTPsYiTAVgmWHa0
tPBwBbLIKJfpEYs7JVBr4KJNuxU3x55MIAS6zJPRFAZmDmSmEBrEYG8a+Gg40bcB
5rbxChp1zsij7JsKW9PyqtEXKAY1zK4ht14biTg5ritLiEqYzltUwdlRNPB9/xaM
nb1KRoYrFY1saGUpN4IDBD+Ou9MaI+nU26+3zDITE1Y/+CwpDudFLu1UZWs2Nj3+
zA6++9hNFJIUcqw+KM7H+YjjQd5uZ1i1AZsE6YQbYB8ZharQhv/haOYaZSlTgFl/
LgbMXJ46hLPsr840EeOhRPpARQb9n3Pl66NUtgh520DzRM2foyZHtUdrE61BbhK+
57qoO3KNf21LCS7HSBbuzEvJwFzE/ClOa5uIskouyWDNRbj5713nDOnQJMNh5JJQ
6uZKog3nHayEvWaHvmWIQyl84VB740yuAkSe5Q40OAgsqojL3u6VFQwIiQARAQAB
tC1KYXkgQCBTZWN1cml0eVNwcmVhZCA8amF5QHNlY3VyaXR5c3ByZWFkLmNvbT6J
Aj0EEwEKACcFAlIVuiACGy8FCQeGH4AFCwkIBwMFFQoJCAsFFgIDAQACHgECF4AA
CgkQsPh+nLCDXXiyvA//bf2M7xGucuDCn2PLSIKPcLBpLzl3nEUDOpLm7h92zNym
C8j57i7Oyvr/szrko1nOdR3eChsxLZ6RgL8M8eBt+R/rXtVj5DYgVVGyNjNwalHE
FY/V2TIz3M5gklvgS2cS9/ofnnh3En9Ymwq2Q/dEF6AKqhU2LVfIV0O+We3nAK7s
f0eg9hQM4lEcqG1qpwseL+Q9p/BgZnQHtjtdEeVsi5yerZqTUpkHSR1DVGsm/FeH
6lq0wPwPgCxZelxjNCuYeOvo1An4pixLwjvMJ860CDRX0XQ/vecEEkJYL5eWgZlm
tPBwBbLIKJfpEYs7JVBr4KJNuxU3x55MIAS6zJPRFAZmDmSmEBrEYG8a+Gg40bcB
5rbxChp1zsij7JsKW9PyqtEXKAY1zK4ht14biTg5ritLiEqYzltUwdlRNPB9/xaM
/BJKBqCJ39qthzS6sYAxdoFcGuyxYnhPYQ3lbCjN5l8ALXSP+eOxh4FRb0JFWxLa
2e5g6dxwZRjW+ubi7Dv5qtu+Xo/XI/d5W7IA0L+KVD57SszHsUu1/fVaZWwzVrRm
P9osYVCmhuhUvxRLi3Z0WQ+UceEojGzKMh1iVRtmgRQ7soE6AYngYMPuq+WHRQDn
UdF0zOne3RdZfKvk/bpfRRl3hzxrZrwdy/cF8A512Fi8K4DBoVTs49IqVT45wB+5
Ag0EUhW6IAEQAL7LvHA/HGQJVfvW2mjPRfgCw5GlvsdIo1w95QNcv/WnH1nIfrmp
ChqA0IGuZhBwARtw1n0ePV0pgddui5wTkPUN7qk59CLAdk6Qy3cenonhOurdp39U
QwepwIVvdCWWUW2jL68BrPbxF6kGERkvqQllig798xFgNvnJhVgHMow1LIK+8Vhd
x1asLgwuiVmJ1tTSQr9AMIcFOXTzdmiOstrUK8rHyJ8V3aecLLCnXwga2FPpfTtB
ivF6pWMh/5QhhjlEdeSXXwLzJbuut8IwVHeRRZuoInFfiDyWScAzwPV65TwT62GB
43KL6C6etl42SQQ+XMebZ8F7mD778PbLFxsdmgcvfCLV4Ar8PbWcqjqrqZPj5059
yb4Zmn9otR6nmlG23sOoqhqhUKrxFplmK0GWejA4Blng2L8u4QXPynm/xC6MnMWA
4kRIQp0zcrwU1FiNxMx8wkn5mquj/+Flyhayy+B5oOeO7/bDMYopNYLavAqrWC24
8ac9J77jEI+V+ojPg5jTSzsuZzzr6JgyojlpaatvOreOGXBsZhJUFXWtQhOdUGha
tPBwBbLIKJfpEYs7JVBr4KJNuxU3x55MIAS6zJPRFAZmDmSmEBrEYG8a+Gg40bcB
5rbxChp1zsij7JsKW9PyqtEXKAY1zK4ht14biTg5ritLiEqYzltUwdlRNPB9/xaM
BEQEGAEKAA8FAlIVuiACGy4FCQeGH4ACKQkQsPh+nLCDXXjBXSAEGQEKAAYFAlIV
uiAACgkQTf1KvohhOYd8hRAAli4hT6ofgENjcYAzeN7uDcwqmd5DjzrsRTOkRPSV
zOYTug2iXxKBywgTYin8sO9dNjVD8jh4sW5diqPwCHm27ID9Q9ndwL50fNPSHVve
tPBwBbLIKJfpEYs7JVBr4KJNuxU3x55MIAS6zJPRFAZmDmSmEBrEYG8a+Gg40bcB
5rbxChp1zsij7JsKW9PyqtEXKAY1zK4ht14biTg5ritLiEqYzltUwdlRNPB9/xaM
tITp6+20h8FXPhM/zR5qosF57qaglHa3IBLKZ1/2s071Ppa+5o33VO5n6Gw4uUuE
o0zH0YP9fzyO3reC9LDFdwILyNAcQ+6pwi+Eye8e+5ob0GNKjh1+Uw2iPk0+omQC
NxNoNWotoJ5wDOvmwbSkNwP1U4xALw/xNETkR7iwR5jisgk2SBXyolc+rYyNLj08
zI3BHk8r/371pcR+bI0RazGxrrFu96WP/pj5pMLdsgm93xF0rMDLStktNd0mmIUW
TAAZ8AATxgXo3dMdbEl2KNF7Es5qTq+q2HNtfq8q6EPKzzlGWNvaUnfFKp5FxUzt
VlHO5MGd3z6SM6uEFU9N04Rv4H4l3pa+S/GJzEpiOL6MynH+vQd30wGX8bOx4hYM
tJXMJ/REm5qIM4M1n370Hi+mCLL1W5HNbH+gkZj2blSWFI4XC41spFGhyqRik2rm
1OdQXQ//bzmTPAMFtKX8VcWzjK5WL5O75YQPPZnuNyvbjIFgBbRyaiflARgpy6OR
a6epF5dXLrRb3qSK3m5sIfb/0dVaoVwTKGVL2wpA25UfB6fi3NGvfwH05HgTXY9G
tPBwBbLIKJfpEYs7JVBr4KJNuxU3x55MIAS6zJPRFAZmDmSmEBrEYG8a+Gg40bcB
5rbxChp1zsij7JsKW9PyqtEXKAY1zK4ht14biTg5ritLiEqYzltUwdlRNPB9/xaM
Jg1NcskSiFrsosH3L9Uyha+koxgywERmzw72ir5dUMFjIBcaF4g=
=ZqAh
—–END PGP PUBLIC KEY BLOCK—–
That’s great, now someone has your public key in plain text, how do they import it into their PGP software? The other person needs to put this text into a plain text file and import it into their PGP compatible application. Sending the .asc file is much easier but the plain text method ensures that anyone with PGP compatible software can email you.
That brings me to the final part of this article, sending and receiving encrypted emails. So far we had no need for the actual Mail application but now is the time to open it. You’ll see nothing different in the main Mail window. One of the changes can be found in the preferences, you’ll find a GPGMail icon on the far right that holds a few very basic preferences. I’ve never had a need to change these. The second and most important change is in the new message window.
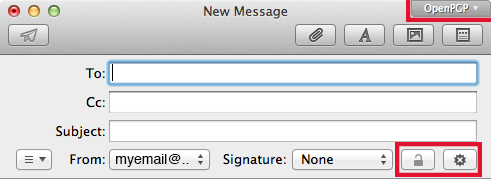
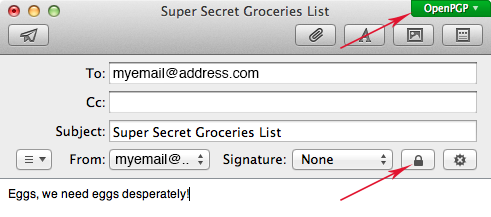
You’ll notice an “OpenPGP” button in the top right corner (may show green for you) and two buttons under the subject field. The two buttons under the subject field give you the option to encrypt and sign an email message. The lock icon will not activate until you enter a To: email address that has a public key linked to it, this needs to be saved in your GPG Keychain Access application. If you do not have anyone’s key in there yet then type in your own email address (the one you created the key pair for). Once you have typed up your email, click the lock icon and you’ll see the ‘OpenPGP’ button turns green. It it was already green to begin with it’s because the digital signature button is enabled by default, this is the button next to the lock icon. I do not typically sign my emails so I keep this off. Mostly because I do not see the value of signing my email (no deniability for example). With the lock closed and the top right button green, the mail is ready to be sent. Only the recipient and you can read it’s contents.
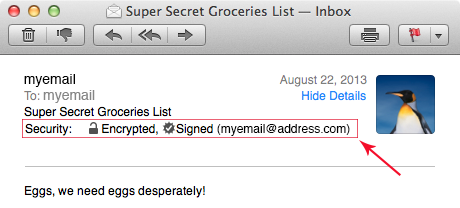
The recipient will see this email and doesn’t have to do anything to see it’s contents. GPGMail takes care of it automatically and just ads a small line of info to the header:
However if this email somehow ends up with someone other than you (someone intercepted it) they will see this:
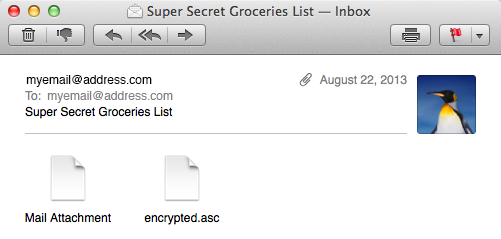
The contents of the message are not visible. Just two attachments that translate to garble when opened or analyzed. Here’s a little cheat-sheet of the GPGMail icons and their meaning:
![]()
Not too bad is it? The biggest issue with using PGP encryption to secure emails is the key management. Obtaining other people’s keys or sending your own is not the most fun task but to squeeze whatever privacy and security you can from email, it’s worth it. Now, passwords are lost, hard drives crash, data gets stolen and in general sh*t happens. It’s a good idea to create revocation certificates and store these someplace safe. These certificates can be published to notify other people that a public key should no longer be used and are your last option if your private key is gone and/or your passphrase is forgotten. To create a revocation certificate open the GPG Keychain Access application and right-click one of your keys. Then select “Generate Revoke Certificate”, do this for all of your keys and store these certificates in a safe place. To tweak/enhance GPGMail there are some terminal commands available here.
GPGMail currently does not work on the beta versions of 10.9 Mavericks but seeing an update released right before 10.8.5 is released makes me hopeful that another update will provide 10.9 Mavericks compatibility in time. UPDATE: GPGTools now has a Mavericks compatible version, download it here. Older installations of GPGTools will not inform you of this new version so grab it from the website.
You’re all set. Everything you need to start sending and receiving encrypted email. If you’d like to start exchanging encrypted email with others and they do not have PGP software or don’t know how this works, just refer them to this article to help them on their way. Whether you want to encrypt all your email to simply make a statement to those that spy on us or just encrypt the important emails, there are a few things to keep in mind.
1. The NSA states that encrypted traffic, like PGP encrypted email, will be intercepted and stored for later decryption.
2. The NSA also started that using encryption can get you labeled as a target and/or terrorist. According to the NSA’s X-Keyscore program using encryption is an “anomalous event” that can be used to find ‘targets’ such as terrorists. Yup, that’s you!
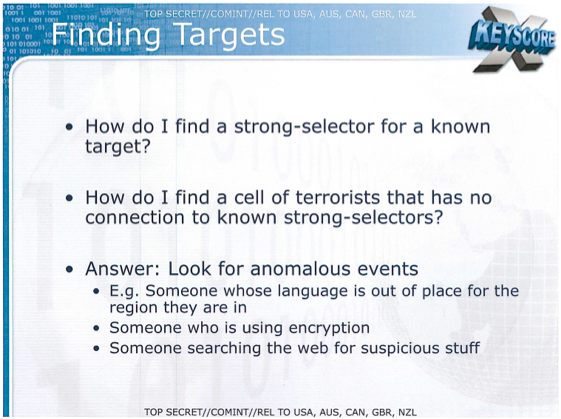
3. Using PGP encryption will hide the body (content) of the email message. Metadata is still visible. So use this encryption in combination with a reputable email provider that is not currently known to be linked to PRISM and other related government programs. It still won’t hide the metadata but at least the email provider will not be collecting/looking/sharing/selling your information. If you want no metadata trail, forget about email completely and switch to OTR encrypted chat over VPN.
For a lot more information, support forums and of course the latest version of GPGToola, find the GPGTools website here. Got this all set up? Had any issues during setup or were you up and running in no time? Let me know in the comments! Enjoy your privacy! 🙂
Thank you for this extensive explanation!
Thanks for your detailed and easy to follow guide!
I always expected PGP/GPG to be al lot harder to install and less easy to use, but your guide makes it simple to install and GPGmail is very friendly to use.
Thanks again!
What’s the difference between installing GPGtools and using the encryption that’s already included in Yosemite’s Mail app?